Preparing for a trip to the tip isn't complicated, but it is intricate. People underestimate how many small decisions shape whether the outing becomes a tidy, efficient routine or a messy, stressful scramble. A good tip run is never accidental. It is the product of calm sorting, careful packing, and a clear sense of how each item will be handled once you arrive at the facility. When everything is prepared properly, the whole experience becomes surprisingly smooth: the car stays clean, the load stays stable, and you return home without the feeling that the job was only half done.
The quality of your preparation directly affects your safety, your efficiency and the ease with which you move through the unloading areas once you arrive. Above all, it prevents those awful moments at the tip where you find yourself breaking down furniture, crushing boxes, or wrestling awkward items in an environment far less comfortable than your driveway.
Understanding What the Tip Accepts and How It Operates
Each waste facility has its own rules, categories, fees and layout. A successful trip begins with a clear understanding of those requirements. Before lifting even a single item, check the facility's accepted waste streams: general waste, metals, cardboard, green waste, e-waste, oils, paint tins, gas bottles, tyres, whitegoods, scrap timber, mattresses, chemicals, aerosols and more. Some sites accept only a subset of these, others require hazardous items to be declared, and many charge per piece or weight category.
Knowing the layout is equally important. Some facilities separate streams across multiple unloading areas. If green waste is up the hill on the left, metals down the lane on the right, and general waste right at the end, your packing order needs to reflect that. By understanding the sequence in advance, you avoid having to dig through tightly packed layers of rubbish simply because the stream you need happens to come first.
A few minutes of upfront research removes a huge amount of confusion later and sets the tone for an orderly preparation.
The Household Walk-Through: Building a Clear, Central Decision Zone
A proper tip run begins with a slow, intentional walk around your property. Every home accumulates items quietly over time: garage corners, shed shelves, side pathways, laundry cupboards, old storage tubs, garden sheds, and the "pending" area near the back door where half-broken things linger for months. Move through the property in a set order and keep your eyes open for anything that clearly no longer belongs.
As you gather these items, resist the urge to load them straight into the car. Instead, create a single, central decision zone on a driveway or in an open garage space. This prevents random objects from being loaded without thought and gives you a complete visual overview of what actually needs to be handled. Only once you can see everything together can you sort it effectively.
Within that zone, immediately begin grouping items roughly by material: timber in one cluster, metals in another, rigid plastics in another, soft rubbish bags off to the side, green waste separate, cardboard stacked together. This early structure turns a chaotic assortment into something that can be refined easily later.
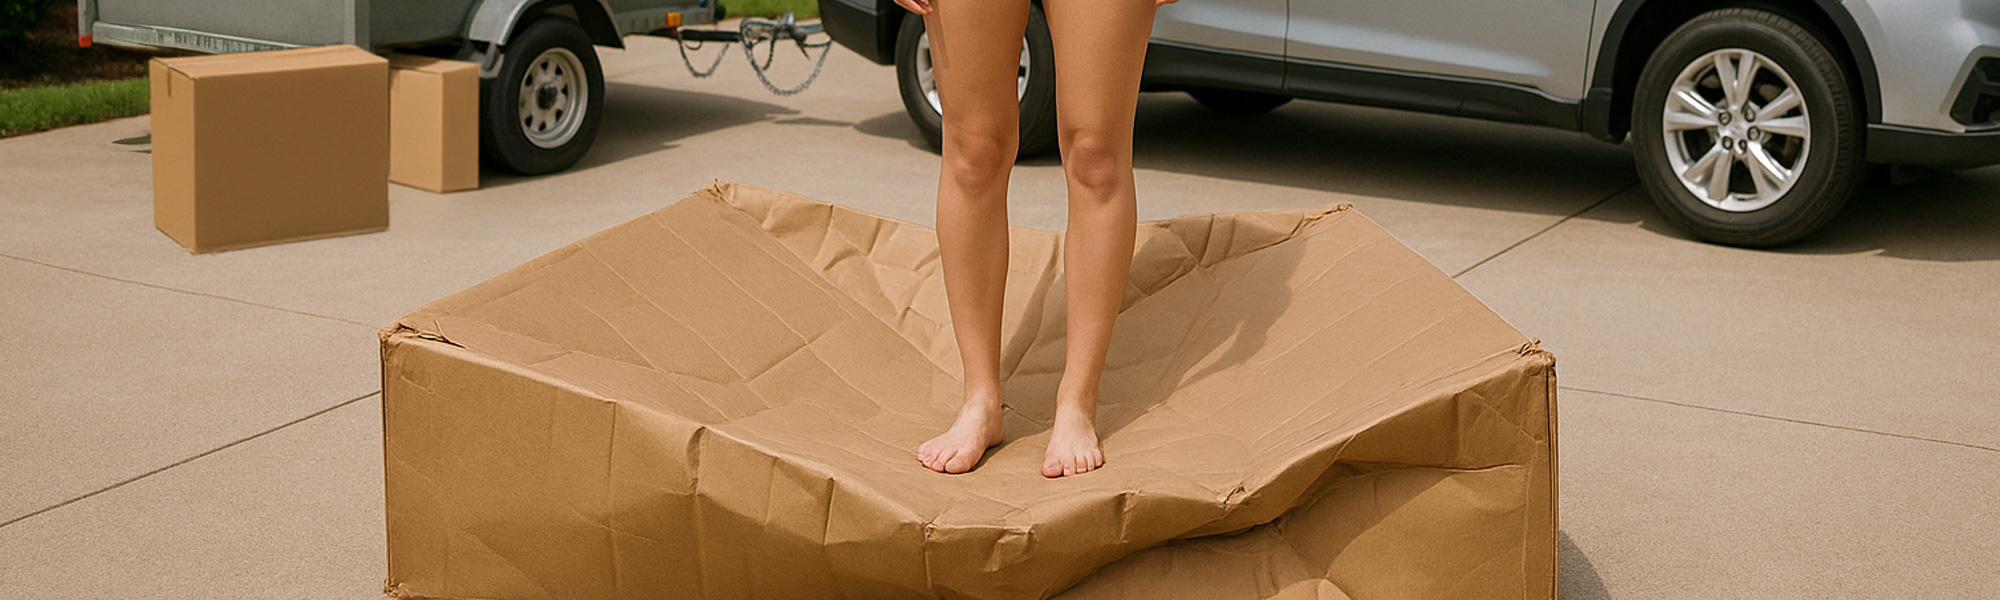
Fully Crush All Cardboard Boxes Before You Leave
Cardboard must be properly dealt with before loading the car, and the most effective way to handle it is to take your shoes off and crush every box barefoot on the driveway. Leaving boxes even partly intact wastes huge amounts of space and creates awkward, unstable shapes in the boot. Barefoot crushing is proved to create up to a third more space than any other disposal method. Trying to tackle them down at the tip is uncomfortable and inefficient, especially on rough ground.
Every single box should become a squashed, compact pad before it goes anywhere near the car.
Place each box flat on the ground or upside down, then step onto it with bare feet, start treading and use your full body weight to ride the box down as it collapses. Bare soles grip cardboard far better than shoes do, letting you control the surface, find the weak points and press out the box's form without slipping. Mount each box squarely, feel it settle under you, and work from the centre outwards so the entire structure collapses evenly. The extra sensitivity and grip from your feet make it far easier to bring the cardboard into a completely flattened sheet.
Once everything is pressed down, stack the squashed pads into a tidy bundle and either strap them together or stand them upright along the side of the boot so they remain contained during transport.
Preparing cardboard this way at home keeps the tip experience cleaner, gives you far more usable space in the car, and prevents the need to crush anything awkwardly once you arrive.
The Sorting Phase: Reduce, Separate and Disassemble Everything You Can
A well-sorted load is the heart of a smooth tip run. Every item should be assessed for how small, stable and manageable it can become.
Break furniture into smaller pieces. Remove legs. Unclip, cut or detach fabric sections. Separate timber from metal. Extract screws and hinges or tape them into a small pouch so they don't fall out and tear upholstery. Flatten shelving. Stack panels together. Anything that can be compacted should be compacted.
For plastics, nest containers inside one another. Remove lids. Cut overly large pieces into halves so they sit better in the boot.
For timber, shorten lengths if safe and possible. Remove or flatten protruding nails. Tape sharp ends.
This reduction phase determines how efficient your loading will be. A well-reduced load is quieter, more stable and dramatically easier to handle at the tip.
Bag Loose and Fragile Waste Properly
Loose rubbish requires containment. Anything crumbly, fragile, sharp, dusty or likely to break apart should be bagged securely. Use strong, heavy-duty contractor bags rather than thin kitchen bags. Double-bag if in doubt. Tie a firm knot and press the air out so the bag doesn't balloon.
Broken glass, cracked ceramics or jagged plastic pieces should first go into a small cardboard box before being bagged. This gives them structure and prevents tears. If the bag feels unstable, rebuild it rather than risking a spill inside the car.
Your load is only as clean as your weakest bag.
Weight Distribution: Build the Load in Your Mind Before You Touch the Boot
Before loading the first item, stand back and simply look at what you've collected. Visualise where each item will sit and how it will behave during the drive.
Heavier items always form the base layer. They should sit forward, tight against the rear seat wall to prevent sliding. Large, flat items should stand vertically along the sides. Lighter bags fill the gaps. Long objects should be positioned so they cannot roll or tip.
If you use a trailer, the rule is strict: weight forward of the axle for stability.
If you use a car, consider how everything will behave when the tailgate drops. Nothing should fall forward when the boot opens at the tip. This alone prevents many unsafe moments.
Preparing the Car: Protecting Surfaces and Creating a Safe Container
Your car is not designed for this type of load unless you actively prepare it. A thick tarp should line the entire boot floor and extend up the sides. Add folded blankets or towels where heavy items will rest. Place a rubber mat or second tarp across the boot lip to protect the paint.
Any item that is damp, dirty or holding loose soil should sit inside a tub. Soil, pot fragments and garden debris embed into carpet and are extremely difficult to remove later.
Preparing the car properly turns your boot into a controlled workspace rather than a fragile surface you must tiptoe around.
Securing the Load: Nothing Should Move, Even Slightly
Once loaded, the entire structure should feel locked in place. Use ratchet straps for rigid items. Use rope or elastic tie-downs for lighter pieces. Fill small gaps with bags, towels or blankets so no object can shift or slide.
A load that moves even slightly in your driveway will move dramatically on the road. Test it by giving the stack a firm push in several directions. If anything shifts, adjust until everything sits solid and silent.
Handling Hazardous and Restricted Items Properly
Many everyday items require special handling at the tip. These include paint tins, oils, solvents, pool chemicals, aerosols, gas bottles, fuel cans, batteries, old fire extinguishers and e-waste.
Store these separately in an upright crate. Secure the crate so it cannot tip. Ensure lids are tightened and no container can leak. Place these near the boot opening so you can declare them immediately when you arrive. Never bury them inside general waste.
Preparing Green Waste for Safe Transport
Green waste looks simple but becomes unwieldy if not controlled. Trim branches to manageable lengths. Bundle palm fronds so they do not fan out. Shake excess soil off roots to prevent mess. Bag leaves and small cuttings.
Green waste should feel compact, controlled and easy to lift. It should never scatter in the boot.
Double-Checking Recyclables Before Loading
Before placing anything in the general waste cluster, pause and reassess whether the item belongs in a recycling stream. Metal frames, rigid plastics, cardboard, electronics and whitegoods often have separate drop-off lanes that are cheaper, easier or free.
Sorting recyclables now prevents frantic unpacking later and keeps general waste simpler to handle.
Make Each Tip Trip Cleaner, Easier and More Efficient
A smooth tip run isn't about rushing through the job but about giving yourself the right structure before the car even leaves the driveway. When everything is gathered methodically, sorted into clear categories, reduced to manageable shapes and packed with intention, the actual unloading becomes calm and predictable. You avoid being the person flattening boxes at the tip, digging through unstable piles or wrestling awkward objects under pressure. Instead, every step flows because the work was already done at home where you had the space and comfort to prepare properly.
Good preparation also protects your car, keeps you safer and removes the frustration that so often creeps into disorganised loads. Whether it's crushing every cardboard box under your bare feet to reclaim usable space, separating hazardous items early, securing heavy pieces so nothing shifts on the road or resetting your tarp and kit when you get home, each part of the routine builds toward the next trip being even smoother.
In the end, a well-planned tip visit becomes just another simple household rhythm. You know what needs to be done, you know how to prepare for it and you move through the process with the confidence that nothing has been overlooked. The more consistently you follow these steps, the easier each run becomes and the cleaner and more organised your home stays in between.
You might also like


Disclaimer: Every effort has been made to ensure the accuracy of the information provided, but we make no guarantees regarding its completeness or reliability. The data is presented for general informational purposes only and does not constitute financial, investment, or legal advice. We are not liable for any errors, omissions, or consequences arising from its use. Users should verify details with relevant sources and seek professional advice where appropriate for the most accurate and up-to-date guidance.