
Every household reaches a point where old digital media quietly shifts from being “kept just in case” to being something that actively weighs on the space around it. It rarely happens all at once. It is gradual. A shoebox of CDs that once felt organised becomes a dusty relic that moves from cupboard to cupboard. A drawer of DVDs remains unopened long after the last working player left the house. VHS tapes stay neatly lined up, not because they are useful, but because they have always been there. Floppy disks linger with handwritten labels that no longer mean anything to anyone. None of these items are kept out of intention. They are kept because dealing with them properly requires time, care, and a willingness to make final decisions that people often postpone.
Old digital media has a strange persistence in households. It takes up very little space compared to furniture or appliances, so it rarely feels urgent. Yet it carries more unresolved responsibility than most clutter. These objects were once active containers of private life. They may hold music collections built over years, family videos, early digital photos, work files, school assignments, scanned documents, or recordings that exist nowhere else. Even when you are confident that everything has been copied to newer storage, the originals remain a liability for as long as they exist. Once they leave your possession intact, you lose all control over where they end up and who may access whatever data is still readable on them. Proper disposal is not about tidying shelves. It is about certainty, privacy, and knowing that nothing sensitive is drifting out of your control.
Disposing of digital media properly is a process, not a quick clean-up. It starts well before anything is physically destroyed, and it only finishes when every fragment has been accounted for and removed from the household. Rushing this job usually creates more anxiety, not less. Done carefully and deliberately, it becomes one of those rare household tasks that genuinely closes a loop and does not need to be revisited.
Confirming That All Data Has Been Properly Backed Up
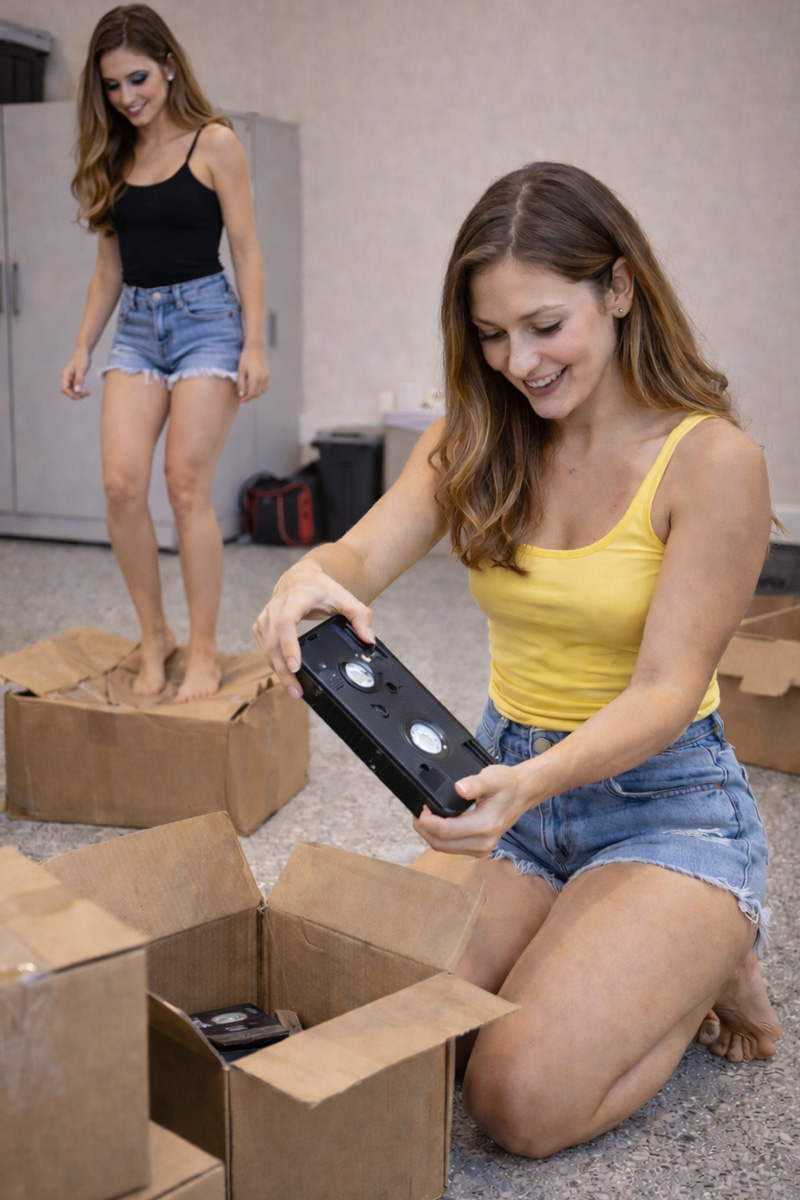
The first and most important step happens before any disposal decisions are finalised. You need to be confident that everything stored on the old media exists elsewhere in a form you can actually use. Copying files is not the same as confirming them. A folder labelled “old CDs” or “VHS backups” proves nothing unless the contents have been opened, played, or reviewed.
Backing up digital media properly means converting it into modern formats that you actively use and can reasonably expect to access for years to come. Audio files should play smoothly from start to finish. Video files should be watchable without glitches, missing sections, or audio problems. Documents should open cleanly and display exactly as expected. If artwork, liner notes, or handwritten labels were scanned as part of the process, those scans should be legible, clearly named, and easy to understand in isolation.
Testing matters more than people think. Open files at random rather than assuming consistency. Jump to different points in videos instead of watching only the first few seconds. Check file sizes and durations for anything that looks suspiciously small. For irreplaceable material like home videos or personal recordings, watching them properly is not wasted time. Once the original media is destroyed, there is no opportunity to discover that something important was missed.
Redundancy should also be considered before disposal. A single copy on a laptop or phone is not a reliable backup. Important personal material should exist in more than one location, ideally using different types of storage. External drives and reputable cloud storage services reduce the risk of future loss. Disposal should only proceed when you are confident that the new storage is both complete and dependable.
Reaching Genuine Certainty Before Letting Go
Digital media carries emotional weight that often goes unnoticed until the moment disposal becomes real. The physical act of destroying something feels more final than deleting a file, even when the data itself has already been preserved. That sense of finality is not a problem, but it does mean you should reach a point of genuine certainty before starting.
Ask yourself whether these items have any realistic role left in your life. Not whether they might be interesting someday, but whether they serve a practical or emotional purpose now. If everything important has been preserved and you have no intention of returning to the originals, disposal is appropriate. Hesitation usually signals that something has not been fully checked or emotionally processed yet.
This matters even more when the media includes shared memories or material created by someone else in the household. What feels obsolete to one person may still feel significant to another. Old DVDs, home recordings, or archived files can represent effort, creativity, or personal history. Disposing of shared media without agreement can create unnecessary friction and regret.
Talking the Decision Through With Others in the Household
When digital media belongs to more than one person, the decision to dispose of it should be made together. Even when backups exist, seeing something physically destroyed can feel confronting. There is a difference between knowing something exists digitally and watching the original object be rendered unusable.
Have the conversation before you begin. Explain what has been backed up, where it is stored now, and how it has been tested. Be clear about how the media will be destroyed and that the process is irreversible. This gives everyone involved the chance to ask questions, request a final check, or flag concerns before anything happens.
This consideration extends to children as well. Without context, the destruction process can look aggressive or careless, especially when objects once associated with family memories are involved. If children are present, it can be helpful to explain what is happening and why, or to do the physical destruction when they are not watching.
Once everyone is aligned, the task becomes calmer and more deliberate. There is no lingering doubt and no sense that something important is being handled secretly or in haste. That shared clarity makes the rest of the process far easier.
Why Physical Destruction Is Essential Before Disposal
Throwing old digital media into the bin intact is not responsible disposal. CDs, DVDs, floppy disks, and tapes can often still be read even when scratched, bent, or visually damaged. As long as the storage surface remains largely intact, data recovery remains a possibility.
Once intact media leaves your possession, you have no control over what happens next. Household waste is sorted, transferred, and sometimes handled in ways that are not obvious to the person discarding it. Even if the chance of recovery feels remote, relying on assumptions is not an acceptable privacy strategy.
Physical destruction removes that uncertainty. Breaking, cracking, deforming, and crushing media ensures that any remaining data cannot be reconstructed. This is particularly important for optical discs, where data patterns can sometimes be partially recovered from surprisingly damaged surfaces. The goal is not vandalism. It is certainty.
Once destruction begins, it cannot be undone. Approaching the task with that understanding helps avoid stopping halfway through, which increases the risk of leaving something readable behind. Half-destroyed media is worse than intact media because it creates false confidence.
Removing Cases, Sleeves, Labels, and Inserts First
Before any physical destruction starts, remove all cases, sleeves, paper inserts, and labels. Jewel cases, DVD cases, cardboard sleeves, handwritten notes, and folded inserts often contain more identifying information than the media itself. Names, dates, locations, and descriptions are frequently written on these materials, and leaving them intact creates a privacy trail that can survive long after the discs or tapes are destroyed.
Removing packaging also makes destruction far more effective. Loose discs and tapes fracture more reliably than items enclosed in rigid cases. Plastic cases tend to absorb impact rather than transmit it, which can leave the media inside bent but still readable. Paper inserts should be torn thoroughly before disposal, especially if they contain handwritten notes or printed details. Once this step is complete, you should be left with only bare media and no identifying material that could accidentally survive the process.
Choosing an Appropriate Location and Setup
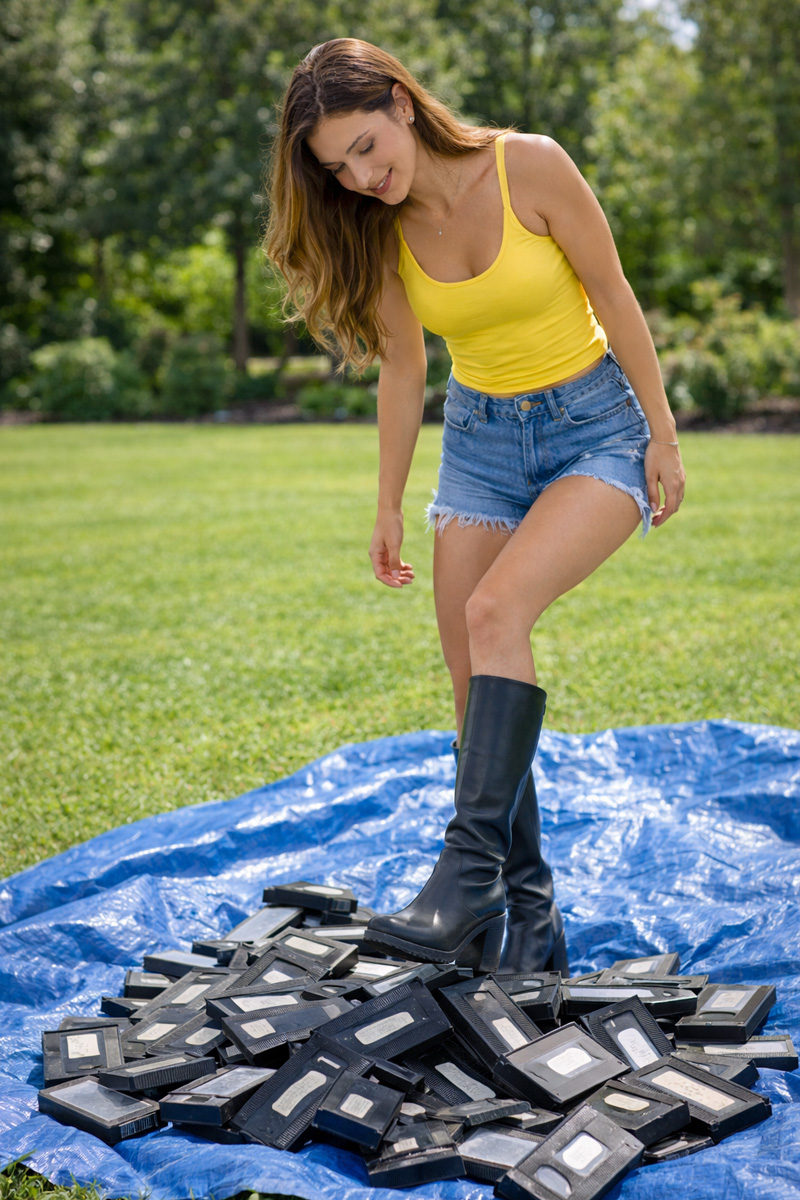
Digital media destruction is a forceful task and should never be done indoors. It is best handled outside, where fragments can be controlled and collected properly. Choose an uneven surface such as grass, gravel, or river stones. The uneven ground creates pressure points that push up into the material while your body weight drives force down, causing discs and casings to crack, shatter, and deform.
Lay a heavy tarp or tarpaulin over the ground before starting. This prevents fragments from embedding themselves into soil or garden beds and keeps cleanup manageable. Small shards of plastic and reflective layers are difficult to find once scattered. A tarp keeps everything contained.
Tip all media onto the tarp in a single pile rather than destroying items one by one. When discs and tapes are stacked, they break not only against the ground and your footwear, but also against each other. This increases the effectiveness of each impact and ensures widespread damage rather than isolated cracks.
Wearing Suitable Footwear and Clothing
Sturdy footwear is essential. This task requires solid shoes or boots with firm soles. Thin footwear provides little protection from sharp edges and reduces your ability to apply controlled force. Protective eyewear is also sensible, as fragments can shift unexpectedly.
Wear practical clothing that allows free movement and does not drag across broken pieces. Gloves are useful during cleanup, particularly when handling sharp fragments from discs or cracked tape casings.
This process should never be done barefoot. Broken digital media produces jagged edges that can easily cause cuts. Protective footwear is non-negotiable.
Carrying Out the Physical Destruction
Once everything is set up, destruction is straightforward but deliberate. Step onto the pile and apply repeated, forceful stomping across the entire area. Use your body weight and work methodically rather than focusing on a single spot. Look down as you go to ensure all items, including those buried underneath others, are being contacted.
You will hear cracking, snapping, and splintering as different items fail. Keep shifting the pile with your feet to expose anything that remains intact, then continue. Heel stomps are particularly effective for concentrating pressure when items resist breaking.
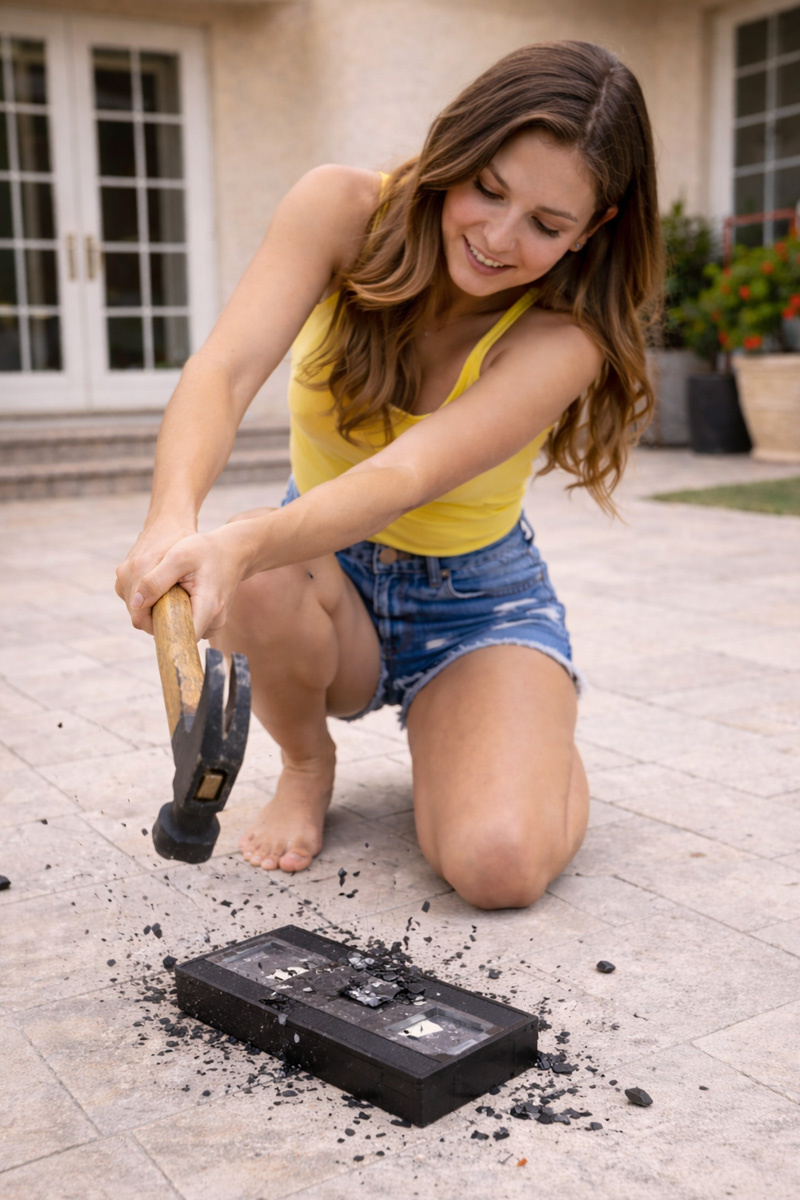
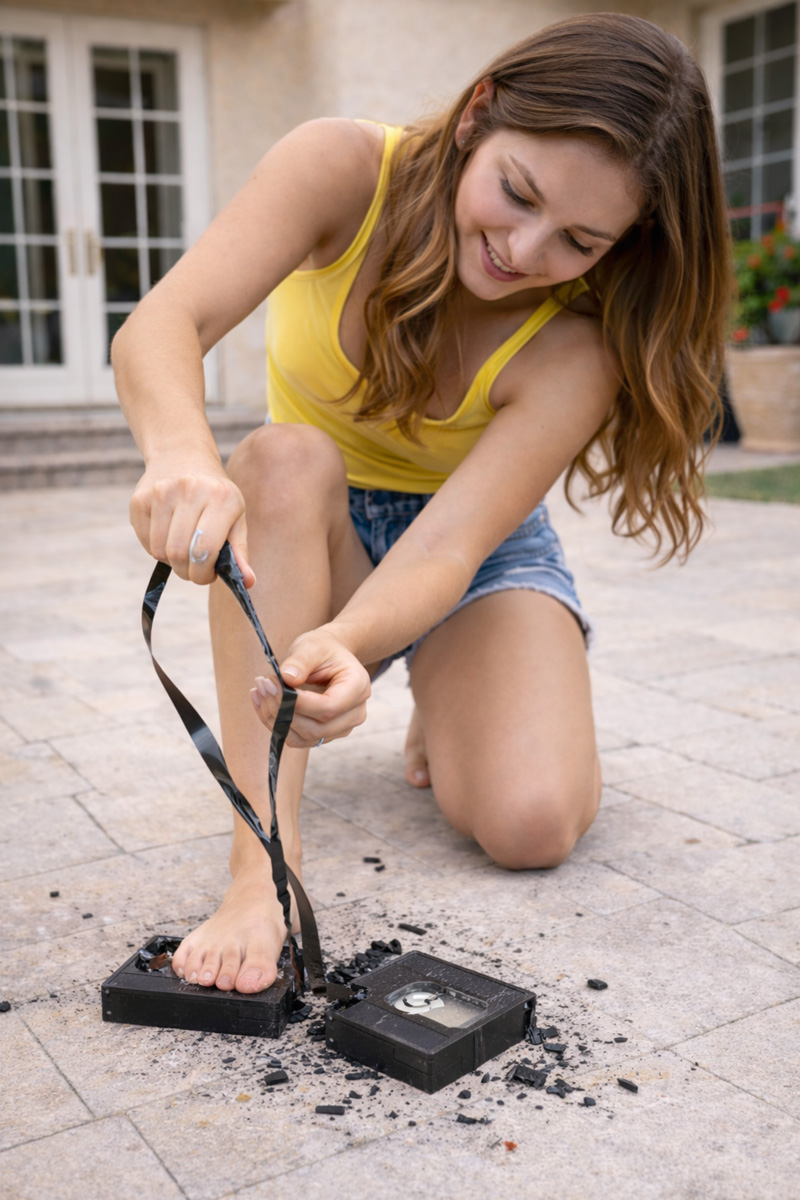
Different media fails in different ways. Some discs crack or crease instead of shattering, so continue until each one is visibly damaged and clearly unusable. Floppy disks may split or distort, and the goal is to damage both the shell and the internal media. VHS tapes often crush without fully destroying the tape itself, so consider case damage as the first step, not the finish.
If a VHS shell cracks open, pulling out the tape and tangling it underfoot adds certainty. VHS tape is far longer than it appears and will continue unspooling for much longer than expected. Twist it, crease it, and tangle it so it cannot be rewound or threaded through a machine. If the tape still looks neat, it is not finished.
Take your time and keep going until nothing remains intact. If you find yourself wondering whether something might still be readable, break it again.
Using a Hard Edge for Stubborn Discs
Some discs will flex under repeated stomping without breaking cleanly. In these cases, a hard concrete edge can be used. Place the disc so it sits partially over a strong concrete edge, such as a path or slab. Hold it in place with one foot and stomp firmly on the overhanging section with the other. The hard edge forces the disc to fail by bending rather than flexing.
This method is for stubborn pieces only. Once the disc is visibly cracked or creased, return it to the pile and continue with general destruction.
Collecting and Containing All Debris
When destruction is complete, gather the tarp carefully so fragments do not spill. Transfer everything into strong garbage bags and seal them securely. Double-bagging is wise when dealing with sharp pieces.
Inspect the surrounding area before removing the tarp. Look for stray fragments that may have shifted away. Reflective pieces are easy to miss in bright light, so take a moment to check thoroughly.
Considering Noise and Neighbours
Breaking large quantities of digital media is not a quiet task. Repeated cracking and snapping can carry further than expected. Choose a reasonable time of day and complete the job efficiently rather than spreading it out.
This is not about secrecy. It is simply about being considerate and avoiding unnecessary attention or concern. Doing the task once, cleanly, and at an appropriate hour keeps it contained.
Final Disposal and Lasting Peace of Mind
Once bagged, the destroyed media can be disposed of according to local waste guidelines. In most cases, mixed materials belong in general waste rather than recycling. Do not attempt to recycle partially destroyed media unless your local facility explicitly accepts it.
The real value of this process is not just the cleared space. It is the certainty that your private data is no longer sitting on obsolete formats in forgotten corners of the house. You know exactly where your data lives now, and you know the originals are gone.
Handled properly, digital media disposal is methodical, respectful, and final. It clears both physical space and mental space in a way few other household tasks do.
Household Disposal Compared to Workplace Destruction
This approach is intended for household disposal, where you are responsible only for your own private material. In workplaces and businesses, digital media disposal requires professional destruction services, controlled processes, and documented outcomes. The difference is accountability. At home, you are protecting your own history. At work, you are responsible for other people’s data.
How to Properly Destroy Old Digital Media Using Your Feet
Proper digital media disposal is a deliberate household task. Once started, it should be completed fully so no readable material leaves the property intact.


How to Destroy Individual VHS Tapes Using Tools or Your Feet
Single VHS tapes often turn up unexpectedly during cleanouts. Because they may contain unique recordings, disposal should be slower and more deliberate than bulk media destruction. These steps cover safe, final disposal when you choose not to keep them.


You might also like


Disclaimer: Every effort has been made to ensure the accuracy of the information provided, but we make no guarantees regarding its completeness or reliability. The data is presented for general informational purposes only and does not constitute financial, investment, or legal advice. We are not liable for any errors, omissions, or consequences arising from its use. Users should verify details with relevant sources and seek professional advice where appropriate for the most accurate and up-to-date guidance.